Publishing Android Application
Publishing Android Application
Android application publishing is a process that makes your Android applications available to users. Infect, publishing is the last phase of the Android application development process.
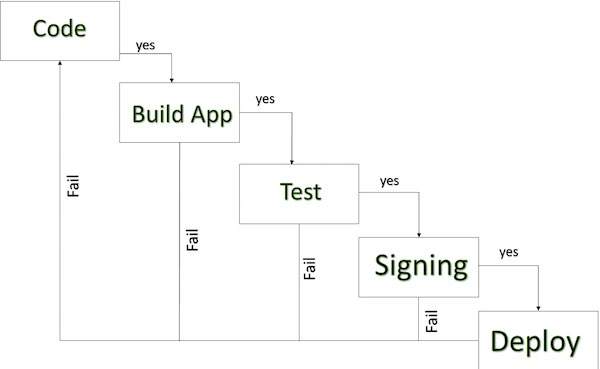
Android development life cycle
Once you developed and fully tested your Android Application, you can start selling or distributing free using Google Play (A famous Android marketplace). You can also release your applications by sending them directly to users or by letting users download them from your own website.
You can check a detailed publishing process at Android official website, but this tutorial will take you through simple steps to launch your application on Google Play. Here is a simplified check list which will help you in launching your Android application −
| Step | Activity |
|---|---|
| 1 | Regression Testing Before you publish your application, you need to make sure that its meeting the basic quality expectations for all Android apps, on all of the devices that you are targeting. So perform all the required testing on different devices including phone and tablets. |
| 2 | Application Rating When you will publish your application at Google Play, you will have to specify a content rating for your app, which informs Google Play users of its maturity level. Currently available ratings are (a) Everyone (b) Low maturity (c) Medium maturity (d) High maturity. |
| 3 | Targeted Regions Google Play lets you control what countries and territories where your application will be sold. Accordingly you must take care of setting up time zone, localization or any other specific requirement as per the targeted region. |
| 4 | Application Size Currently, the maximum size for an APK published on Google Play is 50 MB. If your app exceeds that size, or if you want to offer a secondary download, you can use APK Expansion Files, which Google Play will host for free on its server infrastructure and automatically handle the download to devices. |
| 5 | SDK and Screen Compatibility It is important to make sure that your app is designed to run properly on the Android platform versions and device screen sizes that you want to target. |
| 6 | Application Pricing Deciding whether you app will be free or paid is important because, on Google Play, free app's must remain free. If you want to sell your application then you will have to specify its price in different currencies. |
| 7 | Promotional Content It is a good marketing practice to supply a variety of high-quality graphic assets to showcase your app or brand. After you publish, these appear on your product details page, in store listings and search results, and elsewhere. |
| 8 | Build and Upload release-ready APK The release-ready APK is what you you will upload to the Developer Console and distribute to users. You can check complete detail on how to create a release-ready version of your app: Preparing for Release. |
| 9 | Finalize Application Detail Google Play gives you a variety of ways to promote your app and engage with users on your product details page, from colourful graphics, screen shots, and videos to localized descriptions, release details, and links to your other apps. So you can decorate your application page and provide as much as clear crisp detail you can provide. |
Export Android Application Process
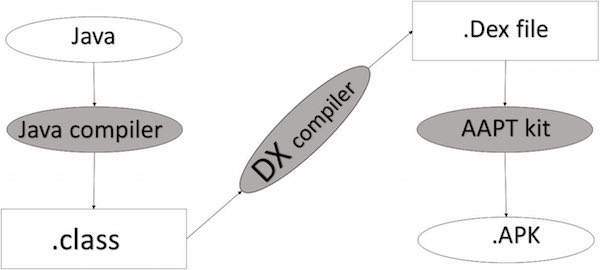
Apk development process
Before exporting the apps, you must some of tools
-
Dx tools(Dalvik executable tools ): It going to convert .class file to .dex file. it has useful for memory optimization and reduce the boot-up speed time
-
AAPT(Android assistance packaging tool):it has useful to convert .Dex file to.Apk
-
APK(Android packaging kit): The final stage of deployment process is called as .apk.
You will need to export your application as an APK (Android Package) file before you upload it Google Play marketplace.
To export an application, just open that application project in Android studio and select Build → Generate Signed APK from your Android studio and follow the simple steps to export your application −
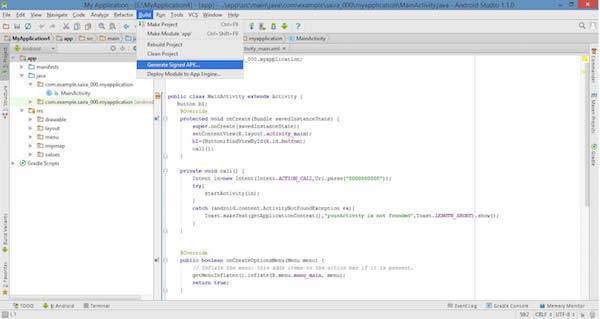
Next select, Generate Signed APK option as shown in the above screen shot and then click it so that you get following screen where you will choose Create new keystore to store your application.
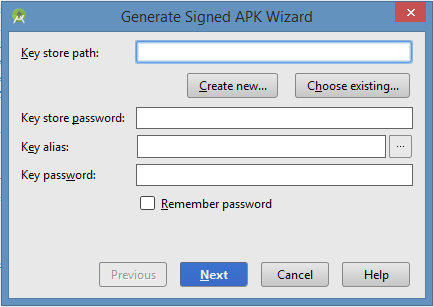
Enter your key store path,key store password,key alias and key password to protect your application and click on Next button once again. It will display following screen to let you create an application −

Once you filled up all the information,like app destination,build type and flavours click finish button While creating an application it will show as below

Finally, it will generate your Android Application as APK formate File which will be uploaded at Google Play marketplace.
Google Play Registration
The most important step is to register with Google Play using Google Play Marketplace. You can use your existing google ID if you have any otherwise you can create a new Google ID and then register with the marketplace. You will have following screen to accept terms and condition.
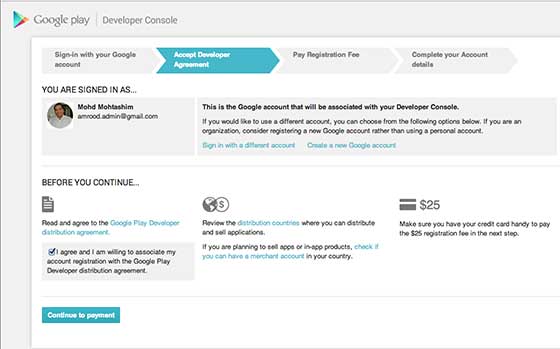
You can use Continue to payment button to proceed to make a payment of $25 as a registration fee and finally to complete your account detail.
Once you are a registered user at Google Play, you can upload release-ready APK for your application and finally you will complete application detail using application detail page as mentioned in step 9 of the above mentioned checklist.
Signing Your App Manually
You do not need Android Studio to sign your app. You can sign your app from the command line using standard tools from the Android SDK and the JDK. To sign an app in release mode from the command line −
- Generate a private key using keytool
$ keytool -genkey -v -keystore my-release-key.keystore
-alias alias_name -keyalg RSA -keysize 2048 -validity 10000
-
Compile your app in release mode to obtain an unsigned APK
-
Sign your app with your private key using jarsigner
$ jarsigner -verbose -sigalg SHA1withRSA -digestalg SHA1
-keystore my-release-key.keystore my_application.apk alias_name
- Verify that your APK is signed. For example −
$ jarsigner -verify -verbose -certs my_application.apk
-
Align the final APK package using zipalign.
$ zipalign -v 4 your_project_name-unaligned.apk your_project_name.apk
Some of App markets
![Publishing Android Application]()
Google play
![Publishing Android Application]()
phoload
![Publishing Android Application]()
APTOiDE
![Publishing Android Application]()
Amazon AppStore
![Publishing Android Application]()
1mobile
![Publishing Android Application]()
Insyde Market
![Publishing Android Application]()
Yandex store
![Publishing Android Application]()
F-Droid
Samsung Galaxy AppStore


Frequently Asked Questions
Recommended Posts:
- Android Tutorial
- Android - Overview
- Android - Environment Setup
- Android - Architecture
- Android - Application Components
- Android - Hello World Example
- Android Resources Organizing & Accessing
- Android - Activities
- Android - Services
- Android - Broadcast Receivers
- Android - Content Providers
- Android - Fragments
- Android - Intents and Filters
- Android - UI Layouts
- Android - UI Controls